What is Jenkins? | Jenkins For Continuous Integration
Continuous Integration is the most important part of DevOps that is used to integrate various DevOps stages. Jenkins is the most famous Continuous Integration tool, I know you are curious to know the reason behind the popularity of Jenkins and I am pretty sure after reading this What is Jenkins blog, all your questions will get answered.
What is Jenkins?
Jenkins is an open source automation tool written in Java with plugins built for Continuous Integration purpose. Jenkins is used to build and test your software projects continuously making it easier for developers to integrate changes to the project, and making it easier for users to obtain a fresh build. It also allows you to continuously deliver your software by integrating with a large number of testing and deployment technologies.
With Jenkins, organizations can accelerate the software development process through automation. Jenkins integrates development life-cycle processes of all kinds, including build, document, test, package, stage, deploy, static analysis and much more.
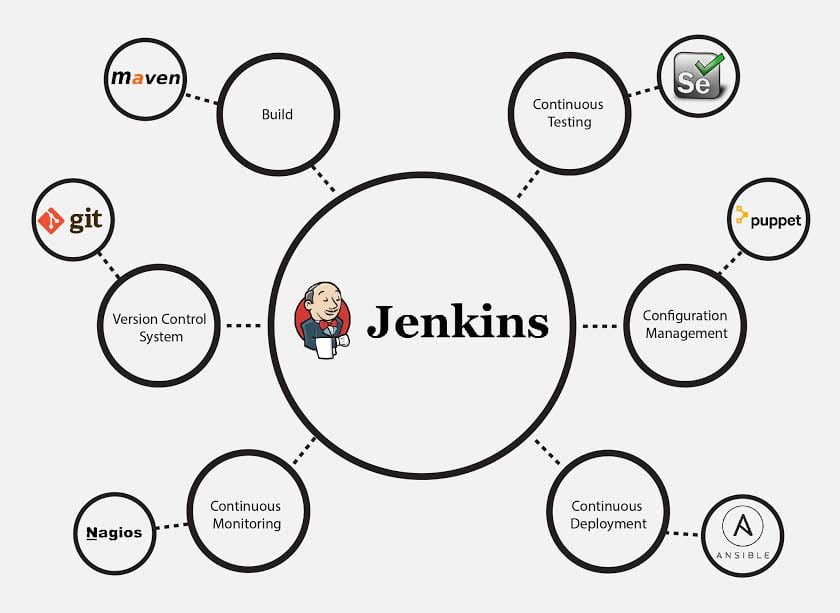
Jenkins achieves Continuous Integration with the help of plugins. Plugins allows the integration of Various DevOps stages. If you want to integrate a particular tool, you need to install the plugins for that tool. For example: Git, Maven 2 project, Amazon EC2, HTML publisher etc.
The image below depicts that Jenkins is integrating various DevOps stages:
Advantages of Jenkins include:
- It is an open source tool with great community support.
- It is easy to install.
- It has 1000+ plugins to ease your work. If a plugin does not exist, you can code it and share with the community.
- It is free of cost.
- It is built with Java and hence, it is portable to all the major platforms.
There are certain things about Jenkins that separates it from other the Continuous Integration tool. Let us take a look on those points.
Jenkins Key Metrics
Following are some facts about Jenkins that makes it better than other Continuous Integration tools:
- Adoption: Jenkins is widespread, with more than 147,000 active installations and over 1 million users around the world.
- Plugins: Jenkins is interconnected with well over 1,000 plugins that allow it to integrate with most of the development, testing and deployment tools.
It is evident from the above points that Jenkins has a very high demand globally. Before we dive into Jenkins it is important to know what is Continuous Integration and why it was introduced.
What is Continuous Integration?
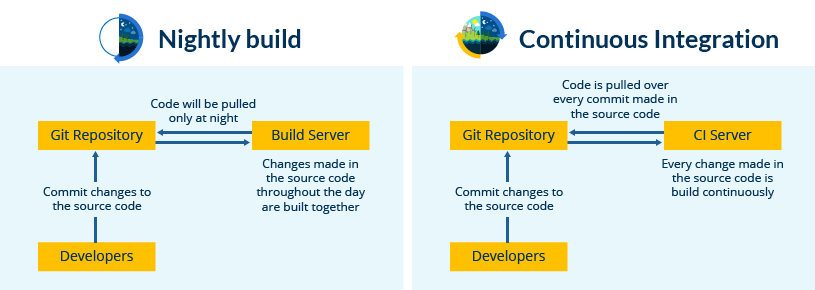
Continuous Integration is a development practice in which the developers are required to commit changes to the source code in a shared repository several times a day or more frequently. Every commit made in the repository is then built. This allows the teams to detect the problems early. Apart from this, depending on the Continuous Integration tool, there are several other functions like deploying the build application on the test server, providing the concerned teams with the build and test results etc.
Let us understand its importance with a use-case.
Continuous Integration in Nokia
I am pretty sure you all have used Nokia phones at some point in your life. In a software product development project at Nokia there was a process called Nightly builds. Nightly builds can be thought of as a predecessor to Continuous Integration. It means that every night an automated system pulls the code added to the shared repository throughout the day and builds that code. The idea is quite similar to Continuous Integration, but since the code that was built at night was quite large, locating and fixing of bugs was a real pain. Due to this, Nokia adopted Continuous Integration (CI). As a result, every commit made to the source code in the repository was built. If the build result shows that there is a bug in the code, then the developers only need to check that particular commit. This significantly reduced the time required to release new software.
Now is the correct time to understand how Jenkins achieves Continuous Integration.
Continuous Integration With Jenkins
Let us imagine a scenario where the complete source code of the application was built and then deployed on test server for testing. It sounds like a perfect way to develop a software, but, this process has many flaws. I will try to explain them one by one:
- Developers have to wait till the complete software is developed for the test results.
- There is a high possibility that the test results might show multiple bugs. It was tough for developers to locate those bugs because they have to check the entire source code of the application.
- It slows the software delivery process.
- Continuous feedback pertaining to things like coding or architectural issues, build failures, test status and file release uploads was missing due to which the quality of software can go down.
- The whole process was manual which increases the risk of frequent failure.
It is evident from the above stated problems that not only the software delivery process became slow but the quality of software also went down. This leads to customer dissatisfaction. So to overcome such a chaos there was a dire need for a system to exist where developers can continuously trigger a build and test for every change made in the source code. This is what CI is all about. Jenkins is the most mature CI tool available so let us see how Continuous Integration with Jenkins overcame the above shortcomings.
I will first explain you a generic flow diagram of Continuous Integration with Jenkins so that it becomes self explanatory, how Jenkins overcomes the above shortcomings:
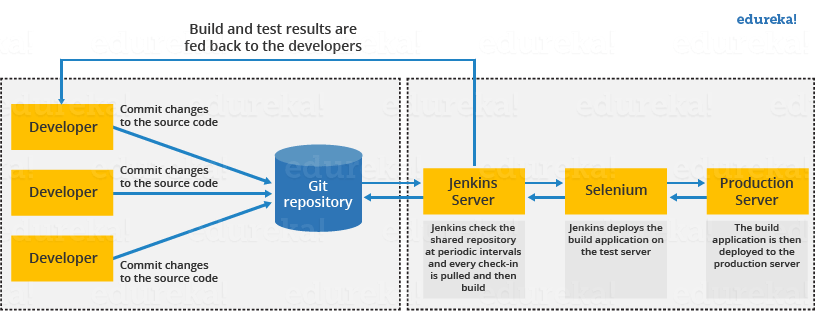
The above diagram is depicting the following functions:
- First, a developer commits the code to the source code repository. Meanwhile, the Jenkins server checks the repository at regular intervals for changes.
- Soon after a commit occurs, the Jenkins server detects the changes that have occurred in the source code repository. Jenkins will pull those changes and will start preparing a new build.
- If the build fails, then the concerned team will be notified.
- If built is successful, then Jenkins deploys the built in the test server.
- After testing, Jenkins generates a feedback and then notifies the developers about the build and test results.
- It will continue to check the source code repository for changes made in the source code and the whole process keeps on repeating.
You now know how Jenkins overcomes the traditional SDLC shortcomings. The table below shows the comparison between “Before and After Jenkins”.
| Before Jenkins | After Jenkins |
|---|---|
| The entire source code was built and then tested. Locating and fixing bugs in the event of build and test failure was difficult and time consuming, which in turn slows the software delivery process. | Every commit made in the source code is built and tested. So, instead of checking the entire source code developers only need to focus on a particular commit. This leads to frequent new software releases. |
| Developers have to wait for test results | Developers know the test result of every commit made in the source code on the run. |
| The whole process is manual | You only need to commit changes to the source code and Jenkins will automate the rest of the process for you. |
Continuous Integration Using Jenkins
Jenkins Architecture
Let us revise the standalone Jenkins architecture that I have explained to you in the previous blog, below diagram depicts the same.

This single Jenkins server was not enough to meet certain requirements like:
- Sometimes you might need several different environments to test your builds. This cannot be done by a single Jenkins server.
- If larger and heavier projects get built on a regular basis then a single Jenkins server cannot simply handle the entire load.
To address the above stated needs, Jenkins distributed architecture was introduced.
Jenkins Distributed Architecture
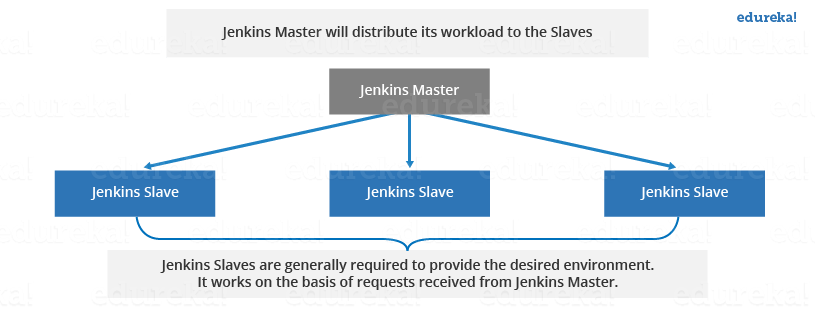
Jenkins uses a Master-Slave architecture to manage distributed builds. In this architecture, Master and Slave communicate through TCP/IP protocol.
Jenkins Master
Your main Jenkins server is the Master. The Master’s job is to handle:
- Scheduling build jobs.
- Dispatching builds to the slaves for the actual execution.
- Monitor the slaves (possibly taking them online and offline as required).
- Recording and presenting the build results.
- A Master instance of Jenkins can also execute build jobs directly.
Jenkins Slave
A Slave is a Java executable that runs on a remote machine. Following are the characteristics of Jenkins Slaves:
- It hears requests from the Jenkins Master instance.
- Slaves can run on a variety of operating systems.
- The job of a Slave is to do as they are told to, which involves executing build jobs dispatched by the Master.
- You can configure a project to always run on a particular Slave machine, or a particular type of Slave machine, or simply let Jenkins pick the next available Slave.
The diagram below is self explanatory. It consists of a Jenkins Master which is managing three Jenkins Slave.
Now let us look at an example in which Jenkins is used for testing in different environments like: Ubuntu, MAC, Windows etc.
The diagram below represents the same:
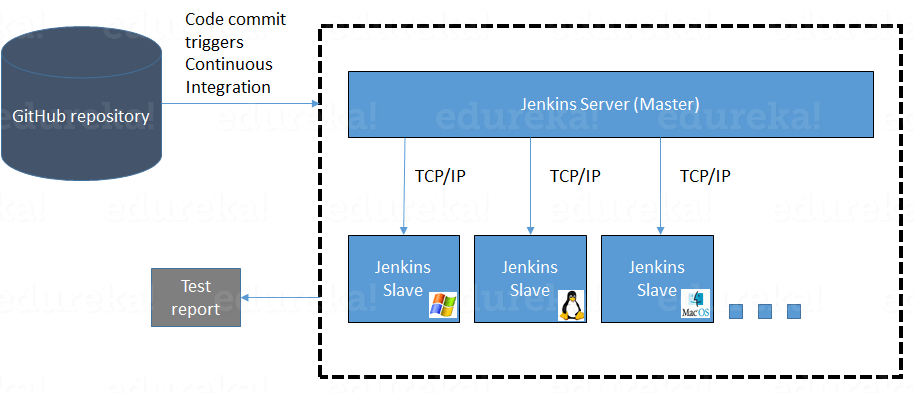
The following functions are performed in the above image:
- Jenkins checks the Git repository at periodic intervals for any changes made in the source code.
- Each builds requires a different testing environment which is not possible for a single Jenkins server. In order to perform testing in different environments Jenkins uses various Slaves as shown in the diagram.
- Jenkins Master requests these Slaves to perform testing and to generate test reports.
Jenkins Build Pipeline
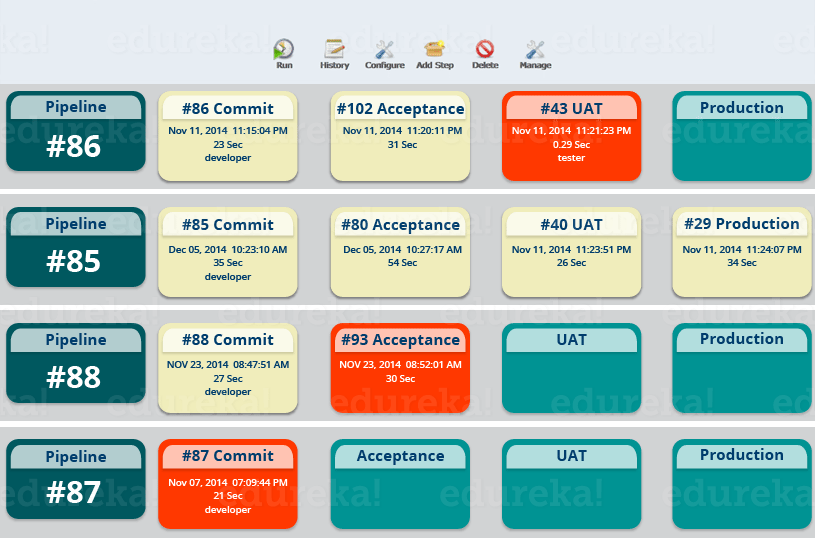
It is used to know which task Jenkins is currently executing. Often several different changes are made by several developers at once, so it is useful to know which change is getting tested or which change is sitting in the queue or which build is broken. This is where pipeline comes into picture. The Jenkins Pipeline gives you an overview of where tests are up to. In build pipeline the build as a whole is broken down into sections, such as the unit test, acceptance test, packaging, reporting and deployment phases. The pipeline phases can be executed in series or parallel, and if one phase is successful, it automatically moves on to the next phase (hence the relevance of the name “pipeline”).The below image shows how a multiple build Pipeline looks like.
Hope you have understood the theoretical concepts. Now, let’s have some fun with hands-on.
I will create a new job in Jenkins, it is a Freestyle Project. However, there are 3 more options available. Let us look at the types of build jobs available in Jenkins.
Freestyle Project:
Freestyle build jobs are general-purpose build jobs, which provides maximum flexibility. The freestyle build job is the most flexible and configurable option, and can be used for any type of project. It is relatively straightforward to set up, and many of the options we configure here also appear in other build jobs.
Multiconfiguration Job:
The “multiconfiguration project” (also referred to as a “matrix project”) allows you run the same build job on different environments. It is used for testing an application in different environments, with different databases, or even on different build machines.
Monitor an External Job:
The “Monitor an external job” build job lets you keep an eye on non-interactive processes, such as cron jobs.
Maven Project:
The “maven2/3 project” is a build job specially adapted to Maven projects. Jenkins understands Maven pom files and project structures, and can use the information gleaned from the pom file to reduce the work you need to do to set up your project.
Here is a video on Jenkins tutorial for better understanding of Jenkins. Check out this Jenkins tutorial video.
Creating a Build Using Jenkins
Step 1: From the Jenkins interface home, select New Item.

Step 2: Enter a name and select Freestyle project.

Step 3: This next page is where you specify the job configuration. As you’ll quickly observe, there are a number of settings available when you create a new project. On this configuration page, you also have the option to Add build step to perform extra actions like running scripts. I will execute a shell script.
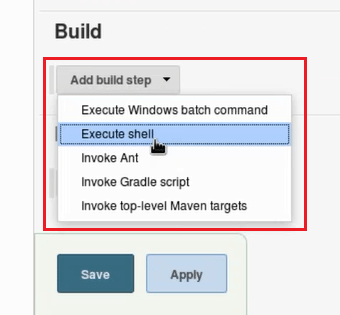 This will provide you with a text box in which you can add whatever commands you need. You can use scripts to run various tasks like server maintenance, version control, reading system settings, etc. I will use this section to run a simple script.
Step 4: Save the project, and you’ll be taken to a project overview page. Here you can see information about the project, including its built history.

Step 5: Click Build Now on the left-hand side to start the build.

Step 6: To see more information, click on that build in the build history area, whereupon you’ll be taken to a page with an overview of the build information.

Step 7: The Console Output link on this page is especially useful for examining the results of the job in detail.

Step 8: If you go back to Jenkins home, you’ll see an overview of all projects and their information, including status.

Status of the build is indicated in two ways, by a weather icon and by a colored ball. The weather icon is particularly helpful as it shows you a record of multiple builds in one image.
As you can see in the above image, the sun represents that all of my builds were successful. The color of the ball gives us the status of that particular build, in the above image the color of the ball is blue which means that this particular build was successful.
In this Jenkins Tutorial, I have just given an introductory example. In my next blog, I will show you how to pull and build code from the GitHub repository using Jenkins.
Install Jenkins In 5 Simple Steps
Install Jenkins
In this blog, I will guide you through the installation process of Jenkins. Just follow the below steps to install Jenkins along with its suggested plugins. In case you are curious to know more about Jenkins, click here to find all the necessary details.
The complete process to install Jenkins can be summarized in five steps:
- Install Java Version 8 – Jenkins is a Java based application, hence Java is a must.
- Install Apache Tomcat Version 9 – Tomcat is required to deploy Jenkins war file.
- Download Jenkins war File – This war is required to install Jenkins.
- Deploy Jenkins war File – Jenkins war file needs to be deployed using Tomcat to run Jenkins.
- Install Suggested Plugins – Install a list of plugins suggested by Jenkins.
Note: These steps are for the CentOS operating system. In case you do not have a CentOS host machine you can install a CentOS VM to go ahead with the installation.
Step 1: Install Java Version 8
To install Java version 8 execute the below command:
sudo yum install java-1.8.0-openjdk

Step 2: Install Apache Tomcat 9
In order to install Jenkins we need to deploy the Jenkins war file by using Apache Tomcat. I will use wget command to install specific version of Apache Tomcat i.e. Tomcat 9 in this case.
First, to install wget execute the below command:
sudo yum install wget

Now I will use wget to download the Tar file for Tomcat 9 using the below command:
wget https://archive.apache.org/dist/tomcat/tomcat-9/v9.0.0.M10/bin/apache-tomcat-9.0.0.M10.tar.gz

Next, I will show you how to extract the contents from this downloaded Tomcat 9 tar file. For this I will use tar command:
tar xzf apache-tomat-9.0.0.M10.tar.gz

To make it simple I will move this extracted file to a new directory Tomcat9 using the mv command and to do that I will execute the following command:
mv apache-tomcat-9.0.0.M10 tomcat9

Our next step is to provide a username and password for Apache Tomcat and for that I will use gedit editor, you can use any other editor as per your comfort.
gedit /home/edureka/tomcat9/conf/tomcat-users.xml
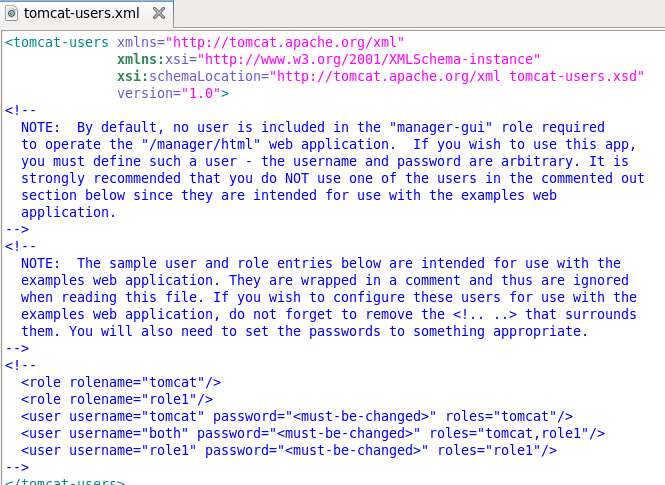
Now delete the content of the tomcat-users.xml file. Copy the below block and paste it in tomcat-users.xml file.
<?xml version='1.0' encoding='utf-8'?> <tomcat-users> <role rolename="manager-gui"/> <role rolename="manager-script"/> <role rolename="manager-jmx"/> <role rolename="manager-jmx"/> <role rolename="admin-gui"/> <role rolename="admin-script"/> <user username="edureka" password="edureka" roles="manager-gui,manager-script,manager-jmx,manager- status,admin-gui,admin-script" /> </tomcat-users>
The updated tomcat-users.xml file will look like this:

In the above image, as you can see that I have defined several roles and for all these roles I have given one single username and password i.e. edureka. If you want to assign different username and password for different roles you can do that as well.
Now save it and close the file to go back to the terminal.
We need to start Apache Tomcat now, but before that I will change my directory to Tomcat9 by executing the below command:
cd tomcat9
To start Tomcat use the below command:
./bin/startup.sh

So, Tomcat has now started.
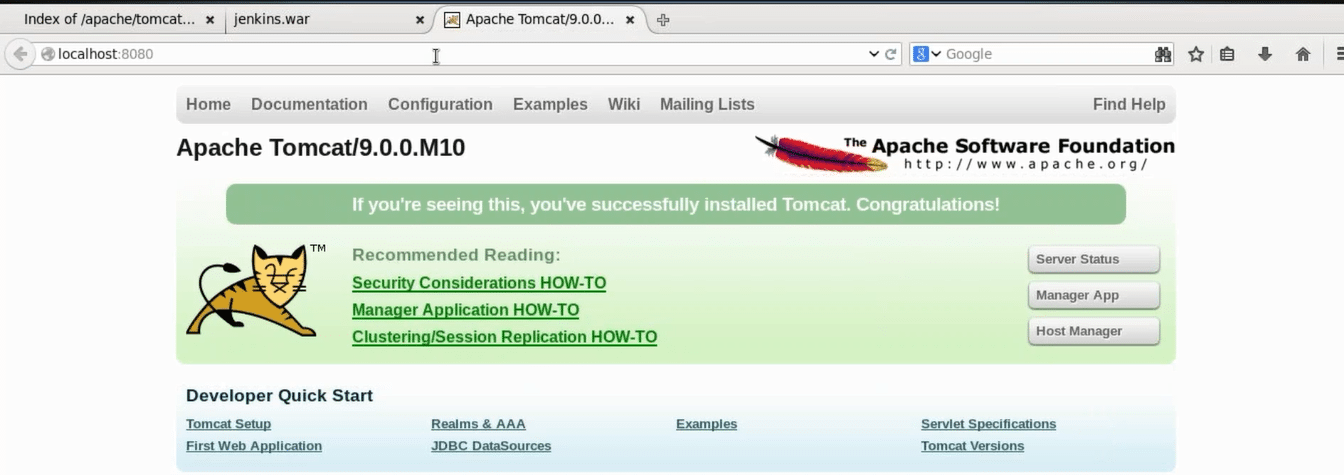
Now open your browser and access localhost:8080 to confirm that Tomcat is up and running. For your information port 8080 is the default port for Apache Tomcat.
Step 3: Download Jenkins war File
I will again use the wget command to download Jenkins war (web archive) file. To get the release list of Jenkins war you can use the URL Jenkins releases

Here copy the link location of the version of Jenkins that you wish to install. I will install Jenkins version 2.7.3, which is highlighted in the snapshot.
Go back to the terminal and move to the home directory by executing the below command.
cd
Now download Jenkins war file by using wget command:
wget http://updates.jenkins-ci.org/download/war/2.7.3/jenkins.war

Step 4: Deploy Jenkins war File
To deploy Jenkins war file that you have downloaded in the previous step, open your browser and access localhost:8080 again. Now click on the Manager App.

When you click on the Manager app, it will ask for username and password. If you remember I have given one single username and password for all the roles i.e. edureka. Type the below mentioned username and password and click OK.
- Username: edureka
- Password: edureka
Now you will be directed to Tomcat web application manager page. When you scroll down you will find an option called Deploy. Over here you need to give the context path, i.e. /jenkins and directory URL, i.e. location of the Jenkins war file in your system in my case it is /home/edureka/jenkins.war and finally click on Deploy.

Now in the Tomcat web application manager page you can find Jenkins listed under Applications along with other web apps.

Now I will click on “/jenkins” which is highlighted in the above image.
Step 5: Install Suggested Plugins
When I clicked on jenkins I was directed to Unlock Jenkins page. Please refer to the below snapshot:
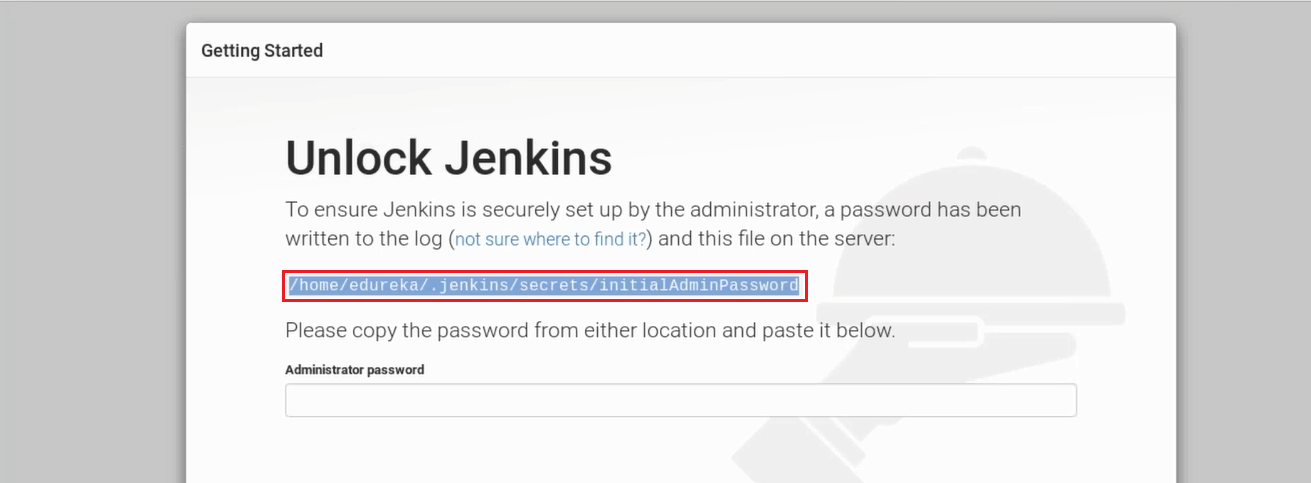
In order to unlock Jenkins first copy the part that I have highlighted in the screenshot above. This is the location that contains your one time password for Jenkins i.e./home/edureka/.jenkins/secrets/initialAdminPassword in my case, it will be different for you. Hence, just copy the path from the screen on your end and go back to the terminal.
Finally, use the following command to get your one time password:
cat <paste the location that you have copied>
This cat command will read the contents of the file that contains the one time password and will display it on the terminal.

Just copy this password and paste it in the Administrator password text-box in the Unlock Jenkins page. Please refer to the below snapshot.
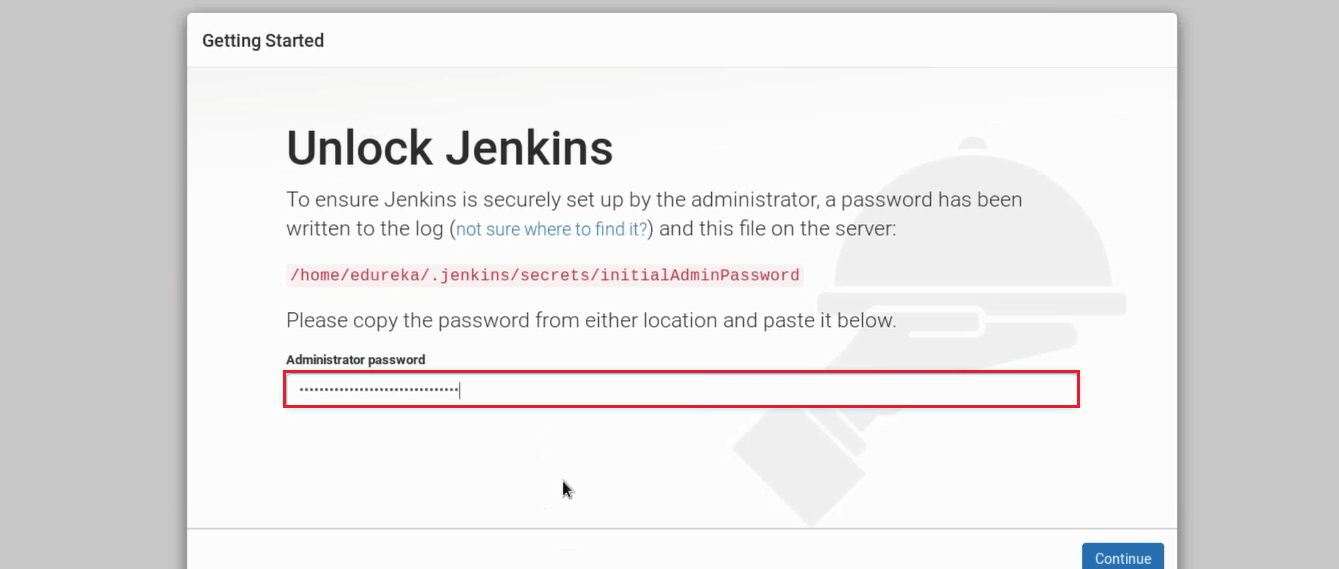
Once you have pasted the password, click on continue.
Now I will install plugins. As you see in the below snapshot there are two options i.e. either I can go with suggested plugins or I can select plugins on my own.
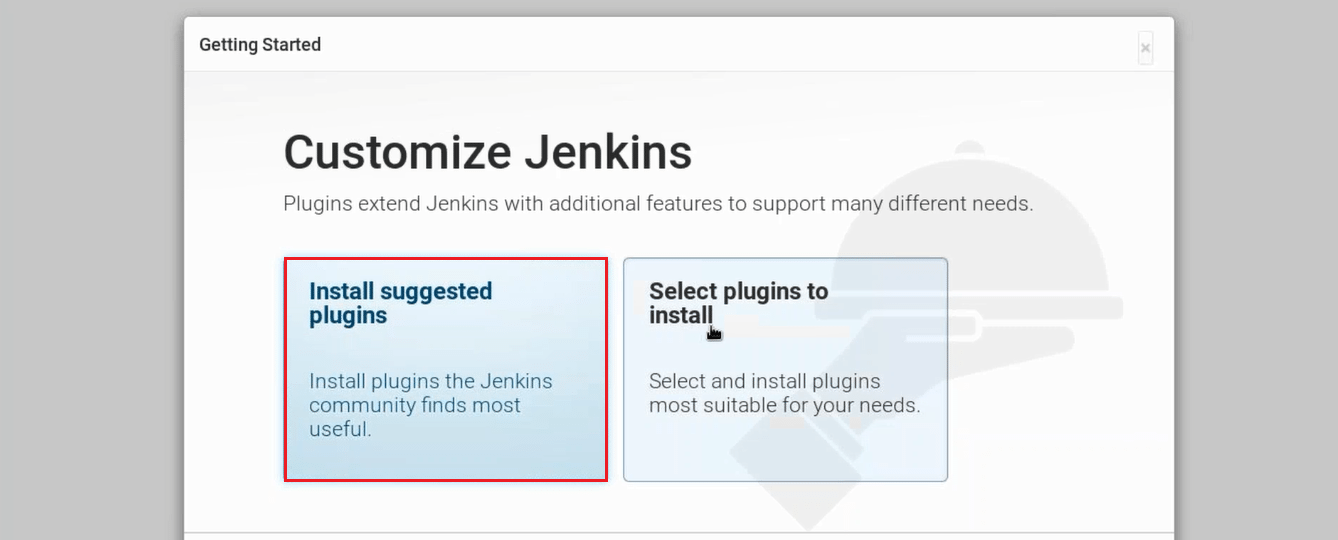
I will go with Install Suggested Plugins.
Snapshot below will give you a list of plugins that will be installed when you click on Install Suggested Plugins.
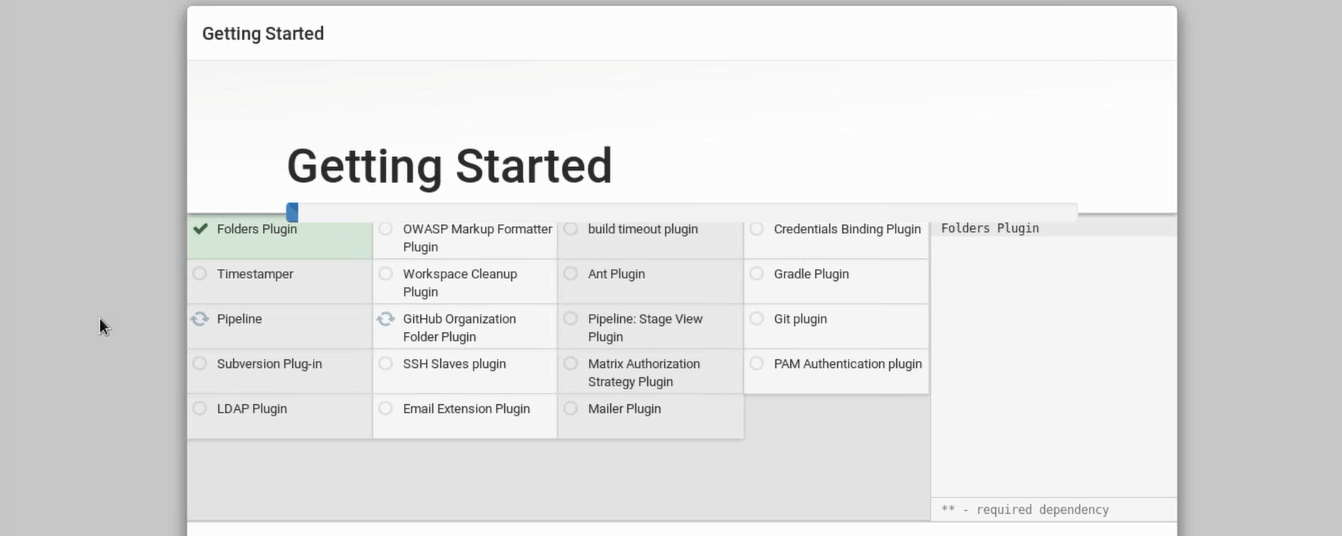
Once the plugins are installed, you will be directed to a page where you have to Create First Admin User. Please fill your relevant details.
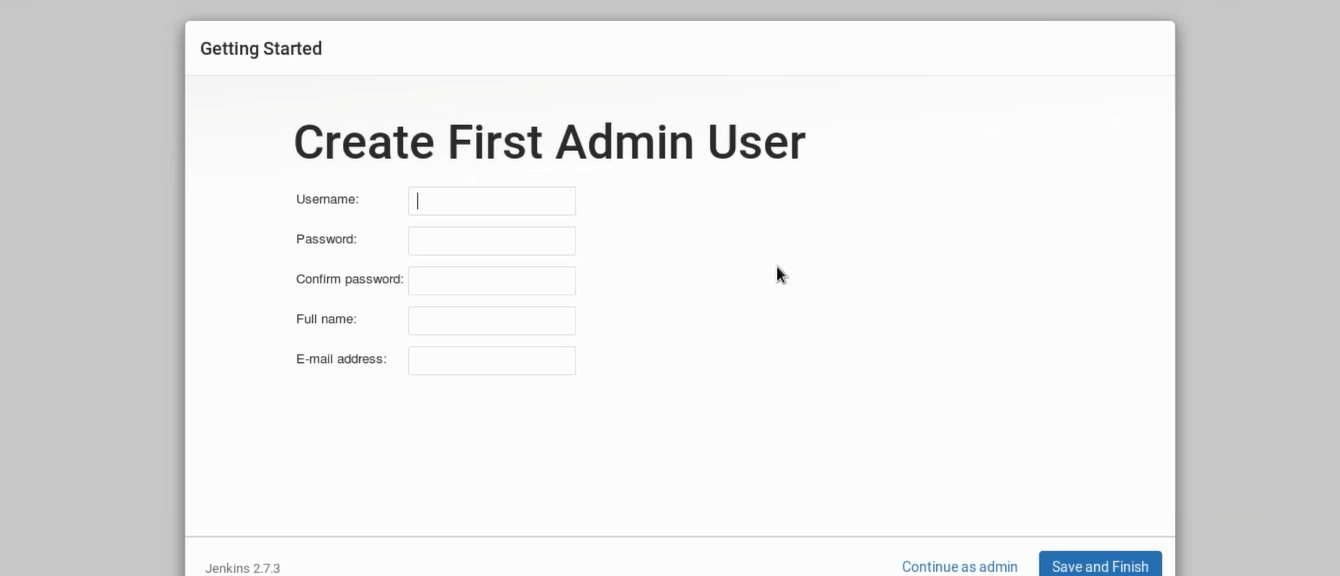
After filling this form, click on save and finish.

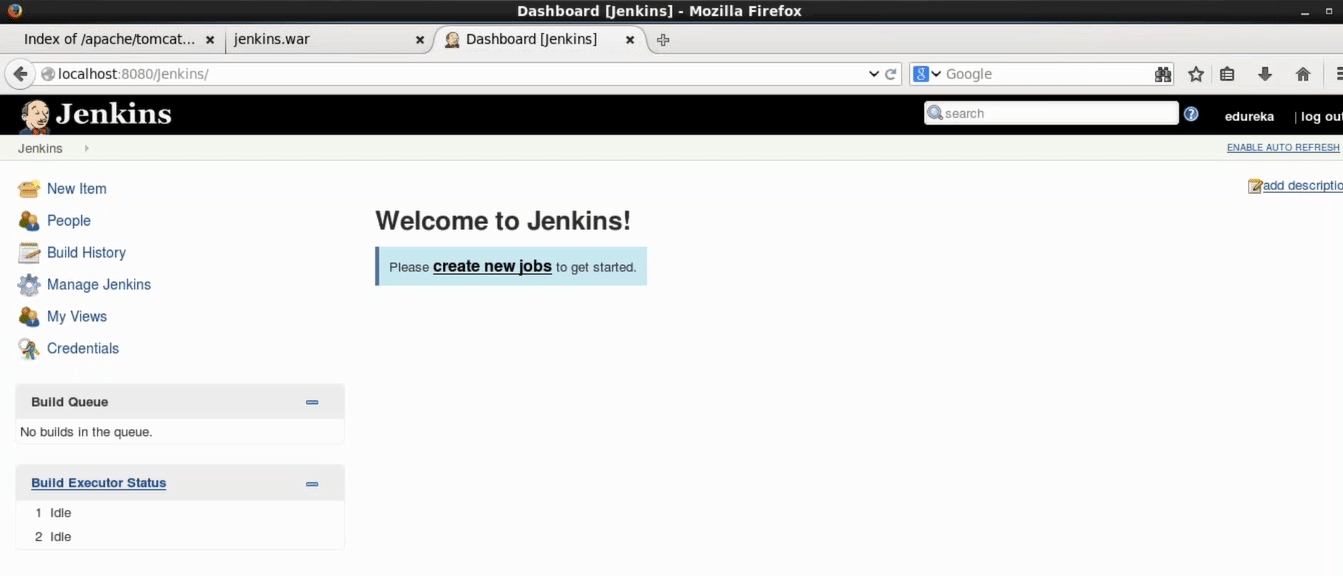
Congratulations! Jenkins is ready now, once you click on start using Jenkins you will be directed to Jenkins dashboard. You can now use Jenkins to continuously trigger build and test for every change made in the source code.

Comments
Post a Comment